Sunday, April 28, 2013

Basking in Moroccan Sunshine....


Let me introduce you to - Barack and Michelle- wonder who they are named after?


                                            Michelle


                                             Barack

They were rescued from a plastic box in Rabat Medina here in Morocco- a man was selling hundreds of them. We got Michelle (pronounced my shell) first and returned a year later to save Barack.

Generally they laze around sunning themselves. Early morning they ease out slowly and then plonk themselves down with legs out so the sun’s rays warm their bodies – this gets them going –for all their cuteness they are cold blooded- so this is rather like the caffeine rush after the second cup of coffee in the morning.


                                           Warming up- Michelle eats at the same time! Their legs
                                           sticking out are cute!

Then it’s munching-hibiscus, mulberries, various grasses, flowers and thistle even seedlings in pots! Maybe supplemented by cucumber, pumpkin, tomato, lettuce or strawberry if I’m feeling in the mood to feed them- otherwise they have to forage.  

 Michelle is getting large but Barrack is still a little guy.


 Then a lazy day behind the flower pots half in the sun half in the shade-ideally beneath a spider plant.


They can be quite shy and hide.


Sometimes they run races – yes they can run!- but that is mainly Barack chasing Michelle. Or pursuing the quest to get past the front door and explore- Michelle likes the bottom of the bookcase and climbing the foot pedal of my sewing machine- maybe she wants to make something? Barrack just wants to look around and examine the perimeter of the new space- sizing up the real estate.

Now and then they bury themselves in the soil- it’s really too warm here in Morocco for them to hibernate properly- they are nomadic too and every few months change routine- different sleeping place-different snoozing place and different sunning place and different food.


Late afternoon- A little exercise climbing some rocks and jumping off the top path into the flower bed- have to be careful to land the right way up and not roll over.

Then it’s a little snack before bed.


Another busy day is over .Time to go to bed.


Life is much more fun here than the Medina box.


Facts and snippits about Tortoises.


Tortoises have a doomed shell above them fused to a flat shell beneath them which protects them from predators. The skin on their heads and legs is soft so they can retract them inside their shell.


People often confuse them with turtles which love water and have flippers. Tortoises have claws and live only on land.

They are reptiles and cold blooded.

They are herbivores and don’t eat meat.

They don’t have teeth but have horny mouths.


They have a life span equivalent to humans with some species living up to 150 years.

They like their own company and are quite reclusive. They like to sleep at night-with some form of protection or shelter.

Males generally have longer necks and females longer claws!

A word of advice...........Don’t get up close to a tortoise in open toed sandals. They are likely to converse with your big toe and in Barack’s case give it a nip if he thinks you might be a female tortoise!


They can be quite smart too. You have no doubt heard the fable about the hare and the tortoise


Monday, April 15, 2013

Adventures in thread crochet


As anyone who has seen my Etsy shop can probably guess, I love to crochet.  I learned from my grandmother when I was 8, and have been actively doing it as an adult for more than 14 years.  My yarn of choice is worsted weight, and I usually use a size I hook.  Sometimes it's fun to get chunkier yarn and pick up an N hook and feel like you're flying through a project.

My great aunt, on the other hand, worked on the smaller side.  I remember visiting her when I was a child and seeing the delicate lacy creations that adorned the backs of her chairs and her coffee table, the bookmark that she gave me that seemed as fragile as the leaves of paper it would rest between, and the hook so small you could hardly see the hook at all making such fine stitches with the thread she used.  It was amazing.

At some point in my crochet journey, between making afghans and baby blankets, scarves and bags, I decided to see if could even come close to imitating the intricate creations that my great aunt used to make.  I bought a few beginning thread crochet pattern books, a few balls of thread, and what seemed an impossibly small size 7 crochet hook.  It wasn't so hard- it's the same stitches as regular scale crochet, after all, but it was tedious.  An afternoon of work, and I'd have made something only a few inches in diameter.  I made a few pieces, but drifted away from it quickly- it was just too much work for too little reward.  Apparently I prefer more instant gratification.

7 hook and size 10 thread (left), I hook and worsted yarn (right)

Thread crochet is done with, as the name implies, crochet thread.  The sizes, like wire, get smaller in diameter the larger the number.  Size 10 thread, also known for some reason as bedspread weight (I can't really imagine crocheting something the size of a bedspread with thread!), is thicker than size 20, which is in turn thicker than size 30.  Thread goes to size 100, which would truly only be a thread.  The steel hooks are generally sized by number or in millimeters.  My size 7 hook- considered a beginner's hook and for use with size 10 thread- is a 1.50 mm hook.  In comparison, my usual size I hook that I use when making my handbags is 5.50 mm.  The smallest thread crochet hook is a size 14, or 0.6 mm.

The times I have found myself coming back to thread crochet is when I have a wedding to attend.  After all, what better time to give an heirloom gift, something that would be treasured by the recipient, a gift that is a bit more personal and special.  Besides, it saves me from ambling through department stores, registry list in hand, trying to decide between the frying pan set, the espresso machine, or the $100 trash can.

And so, as the year began and I realized I had multiple weddings on the calendar, I dug out my crochet thread and pattern books and started on a coaster set.  I figure they're useful as coasters, but also as small doilies or table decorations, and they're generally doable for me since they are small.   
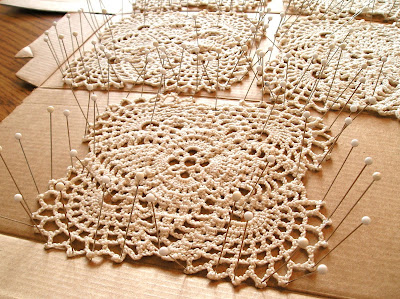
Blocking coasters
Unfortunately, you generally don't make just one coaster, you make a set.  Which means I make seven: six for the set, and one to glue on top of a finished box to hold them and complete the gift.

Every thread crochet book will tell you the importance of blocking for a finished appearance. This is the process of washing the pieces in mild soap, rinsing, starching if desired, and allowing them to dry while pinned to a board that holds any rebellious stitches in place.  Typical thread crochet patterns often include small stitches called picots around the edges, and these like to sit askew unless they are held in place with pins during blocking.  I have found that a piece of cardboard works as well as anything for blocking.  And it's a good thing that I have a lot of pins- blocking seven coasters at a time takes a lot of pins!
The finished coaster box

In the past, I've finished the box myself, which means sandpaper, paint, polyurethane, and lots more time.  This time, I went the easy route and purchased an already finished box.  Much faster and easier, though my color choices were limited.

After completing one set of seven coasters, I realized that doing this two more times was just not going to happen.  Not only is that a lot of coasters to make, but I was already tired of the pattern.  I needed something different, and settled on doily bowls.  There are many patterns for doilies out there, so I picked a few I could find for free online and got to work.  I changed the patterns a bit, decreasing the number of stitches as the diameter increased to give it more of a bowl shape instead of laying flat.

Once my doilies were finished, I used fabric stiffener instead of soap and water.  Apparently you can make your own starch from sugar and water, but that sounded a bit too messy to me, not to mention that it just sounded like an invitation for getting licked by the family cat or chewed by the family dog.  I covered bowls from my kitchen that were an appropriate size for each doily with plastic wrap, and laid the wet doilies on them, trying my best to make sure they were laying flat and the edges were even with each other so the bowl wouldn't sit unevenly once it was finished.


My finished bowls are not perfect- the tops are not completely even, they are not completely symmetrical, but that is the nature of handcrafting sometimes, right?  And the truth is that perfection is sometimes overrated.  My gifts are from the heart, and I hope that the recipients will enjoy using them.  And I just may have been inspired to make a doily bowl for myself... though that project may have to wait while take a break from thread crochet for a bit.  Other projects are calling my name!

Monday, April 1, 2013

Fun with a Kaleidoscope

by FabricGreetings

Ever since I was a child, I have been enthralled with Kaleidoscopes. They always held me mesmerized for hours watching those patterns change and become something else. I never understood how a couple of mirror prisms and some sparkling items could produce such wonderful designs. I have amassed a collection of them since becoming an adult.

My Mother and Father gave me a beautiful brass one in a velvet case one year for Christmas. I have several wooden ones. My husband made me one for a gift. And I have a small cardboard one that belonged to our daughter when she was young. Some have an outer layer that you rotate while looking in that magical hole. Others need to be rotated entirely. They are still a fascination.


You can imagine my delight when I discovered a program called Kaleidoscope Kreator for the computer. It was developed to help quilters produce intricate designs on fabric. My husband was surprised when I called him to find out if my laptop computer would work with the program. It is not Mac compatible. Anyone who knows me knows that buying a computer program for me to use is not something that happens very often.
 
So home I came with my great fun program. He installed it for me and I have enjoyed it ever since. I am going to show you exactly what this can do. The picture that I started with is a picture of yellow tulips and blue sky.


Using this program is so simple. You simply select a shape you wish to use and slide the template over the image on the screen. When you have it where you want it, click save. There is a rather large thumbnail picture that shows up as you are positioning the template, so you can see what you are going to get.

Working with the tulip picture, I first used a diamond shaped template. The red on the tulip petal and the green stem are running down the center of the diamond template in this picture.

 
Next I tried a template that was squared off on the edges. I was able to turn the picture so that the stems came from the edges and you are really able to see that the design is of tulips.


The program also includes some very lacy designs which I think are quite beautiful. You will just have to look and see where the tulips and the stems are.


You can also tile a design and make an allover pattern. If you print this through your computer using one of the printable fabrics available, you have yourself an original fabric design to work with.