Showing posts with label RobinsFlight. Show all posts

Friday, December 5, 2014

I don't live on Pinterest... but thankfully my kids don't care!

by RobinsFlight
The holidays around our house are interspersed with birthdays, which makes for some interesting compromises.  Gift lists must be rationed so that you don't run out of ideas before one occasion or another.  Christmas decorations must be put up only after a certain date so that the birthday before it doesn't get overlooked- and maybe more importantly so that the houseful of children at a birthday party don't knock over the Christmas tree.  And forget trying to burn off that Thanksgiving pumpkin pie before loading up on Christmas cookies, because there's birthday cake in there too.  And once those Christmas cookies are gone, look out... here comes another birthday cake.  The New Years resolution to lose those pounds become the Ides of March resolution, which just doesn't seem the same.

We tend to do birthday parties at home.  Not only does my bank account balk at spending hundreds of dollars on a party while I'm also trying to budget for Christmas presents, but there's something a bit more meaningful about having a handful of close friends over for some fun rather than a gaggle of classmates all running around someplace with barely enough time to scarf down some pizza and cake and tear the wrapping off a pile of presents, not knowing what's from whom.  A few years back I made the realization that it's easier to throw a party for boys than for girls.  Girls like crafts and activities and organized games.  Boys just want to play with the toys at someone else's house and dust out the back of the closets playing hide and seek.

This year the little boy (who consistently tells me that he's not little anymore) wanted a Lego party.  Fine, no problem- we have plenty of Legos, and it seems pretty easy to throw down a sheet, dump the Lego collection on the floor, and let them build and play to their hearts' content, or at least until their parents come to pick them up.  But it seems like there should be some way to make more of a theme to this party.  So I have the bright idea of a Lego cake.  Shouldn't be too hard, right?

I am a mom, a crafter, an Etsy seller- no stranger to the wonders of Google and Pinterest.  So Lego themed baking ideas were easy to find.  I even found some "easy" ones, which was a definite must.  I am particular when it comes to my crafting- mistakes in sewing and crochet get fixed immediately.  But when it comes to baking, not so much.  My recipes often are more like "a handful of this and a dash of that" rather than exact measurements.  When it comes to frosting a cake I go with the "decorative swirls" mostly because it kind of hides the visual imperfections that all of my cakes have- a professional cake decorator I am not.  Things taste good (well, usually... with the exception of my beet red velvet cake experiment... I'll tell you about that some other time) but they just don't generally look professionally decorated.

So I'm not quite sure what I was thinking when, in addition to a Lego cake and Lego ice cream sandwiches, I decided that Lego head marshmallow pops would be fun.  Looks easy, right?  It's just a marshmallow on a stick, coated in yellow tinted white chocolate with an M&M on top.  No problem.

The Marshmallow Blob
Thankfully, I didn't start them the morning of the party.

The problems started with the marshmallows.  I had a bag of marshmallows in the pantry left over from vacation last summer, I didn't need fresh ones, right?  Uh, wrong.  What I had in the pantry was one large hunk of marshmallow, the individual pieces having stuck together long ago, along with bits of sand from that beach bonfire where we last made s'mores.  Ok, so maybe I did need fresh ones.

At least the sticks weren't hard- they sell lollipop sticks pretty much anywhere nowadays thanks to the popularity of cake pops.  Great!  And fresh marshmallows go on the sticks without a problem.

Marshmallow on a Stick- that's the easy part

Now for the chocolate.  I put the white chocolate chips in a bowl, threw it in the microwave for a bit... and burnt my hand trying to pull it out of the microwave!  Oops- apparently I picked the cereal bowl that gets hot in the microwave!  Turns out, this was a good thing- the heat of the bowl kept my chocolate melted for longer, I think.  Didn't help me hold the bowl steady though.  I had to use a napkin to hold it while stirring 3 drops of yellow food coloring into the quarter cup of melted chocolate, and while coating the marshmallows.


 Ok, here we go... I tried dipping the marshmallow into the chocolate, but apparently the chocolate (or maybe just the bowl) was too hot.  The marshmallow just started melting into the chocolate.  *sigh*

Spreading the Chocolate
Round 2.  Marshmallow on stick, dip into cooled chocolate.  Nope.  This time the marshmallow just spun on the stick, came loose, and fell into the bowl!  Ok, so maybe this dipping thing isn't going to work.

Round 3.  Marshmallow on stick, spread chocolate on with a knife.  Well, this is a bit trickier to get smooth, but do-able.  At least the marshmallow stayed on the stick, and the chocolate stayed on the marshmallow.  With a little work I got the chocolate fairly smooth, and stuck a yellow M&M on the top.  Forget covering the M&M with chocolate- it's already yellow.  Looking good now though, I've got it figured out, it'll be smooth sailing from here on.

Oops- now what do I do to keep the thing upright while it's drying?  I wandered around the kitchen for a bit, looking for a crevice to wedge it into.  I finally decided on an empty egg carton (thankfully, I had had eggs for breakfast), turned upside down, with small slits cut in the bumps where the eggs had sat.  Not the most stable thing, and I had to be careful that the pops didn't fall into each other, but it was better than wandering around the kitchen with a yellow marshmallow on a stick in my hands waiting for it to cool.

Hairball Marshmallow

 Alright, one down, and I know what I'm doing, right?  Another marshmallow on a stick, spread the chocolate... except in my search for a stand the chocolate had cooled down too much.  This pop looked more like something the cat coughed up (never mind that we don't have a cat).  Hmmm, not attractive.

Round 4.  Heat up chocolate again- but not too much, so the marshmallow doesn't melt.  Spread, smooth.  Oh, good.  Maybe I am getting the hang of this.  After a few tries, I figured out that it was easiest to cover the top and bottom, then spread and smooth the sides.  And to reheat the chocolate for only about 10 seconds after coating 2 pops.

Ooh, this one looks pretty good!
Practice does make perfect, or at least better.  I ended up with 12 pops, none of which are perfect but only 2 of which look pretty horrible.  And somehow I doubt the kids will mind the imperfections- after all, what kid ever argued about eating chocolate covered marshmallows?  But remind me next time to stop with the cake and ice cream.  Sometimes that "little extra" is more work than it's worth.  But then, maybe my little boy is worth the extra work.  Regardless, it's obvious I don't live on Pinterest.  But I'm ok with that- there are more important things in life than an impeccable marshmallow pop.


This holiday season, may you enjoy the important things in life!

Robin

Finished Pops

Sunday, September 7, 2014

Because you can never have enough sunsets

Those of you who've followed our blog for a while are probably familiar with my vacations, and my sunset photos.  Our family trips to the Sleeping Bear Dunes aren't quite annual, but every couple years we feel the need to get back to this familiar place that is full of beauty and fun.  And such was the case this year, so I thought I'd share some of my favorite photos from this year with you.


I hope you too had a wonderful summer!
-RobinsFlight

Monday, January 13, 2014

Frigid fun

by RobinsFlight

Like many in the United States, last week left us with more snow and colder temps than this area has seen in quite a while.  I know some parts of the country were snowier and more frigid than here in the Detroit area, but our 6-8" of snow, on top of the 6" or so that were already on the ground, was more than my kids had ever seen!  And 30 below (*F) wind chills...well, that had me remembering days when Michigan State University closed classes for a day back twenty years ago, and farther back, remembering walking to school in Wisconsin with friends, all waddling like penguins, we were so bundled up!


Our extended Christmas break, thanks to 3 snow days, left us with some extra time around the house.  And since there's only so long that 2 kids and a mom can handle cooped up indoors, we did venture out a bit.  Before the heaviest of the snow hit, the kids had fun making a snowman, complete with hat, scarf and a carrot nose.  The next morning he had to be dug out, of course- don't want our snowman suffocating under a blanket of snow!


Then there's the general playing in the snow.  My kids are fond of building snow slides and doing their best of fall, flip, and push each other down.  And no snow day would be complete without a trip to the sledding hill.  Unfortunately, my camera didn't accompany us that day.


I think my favorite activity was blowing bubbles and watching them freeze.  Yes, I have to admit, the idea came from the now viral pictures by Angela Kelly that have been circulating on the internet.  But hey, what a great idea!  My photos aren't nearly as good as hers are, but it was fun.  


The temperature was -12*F, and there was a decent wind.  It probably would've been better if the wind had been lighter- it tended to blow the bubbles away with enough force that they'd just shatter when they hit something. 


They froze almost instantly, not a slow crystallization.  I actually had to blow pretty quickly to got any bubbles before the liquid froze on the wand.  And the smaller bubbles definitely lasted best.


I tried it again the next day.  The wind was less, and it was warmer- I think about 6 *F above this time.  The bubbles froze more slowly, but they didn't seem to hold their shape nearly as well.  A few held together though.


So what did you do to occupy yourself during the big freeze?

Monday, December 23, 2013

A bright time at the zoo

by RobinsFlight


Our family visited Cincinnati over the Thanksgiving weekend.  It was a fun time.  On Saturday, we took advantage of the relatively warm weather- the highs were near 50*F- to go to the Cincinnati Zoo.


Each year, like many zoos around the country, the Cincinnati Zoo sets up light displays throughout the grounds.  This year, the displays included nearly 2 million lights, including 20,000 on just the large tree at the entrance!


We arrived at the zoo mid-afternoon, with time to see some of the animals before it got dark.  While some of the exhibits were empty, with the animals tucked away in their winter homes, there were still plenty of creatures to see.


My mother even surprised me by facing her fears and accompanying us into the reptile house!  (And those are the alligators we saw there, not my mother!)


I must admit, I was not as brave as she, and did not go with them into the insect exhibit.  Instead, I sat outside and watched as dust settled and the lights came on.


Soon, it was completely dark, and the lights became the main attraction, lining the paths and covering the trees.


The highlight was the "Wild Lights" show, located around a pond at the center of the zoo and featuring lights that changed to music.


Lots of other people thought it would be a fun thing to do also.  By the time we left, cars were lined up at the entrance in both directions, waiting to get in!  It's definitely a good thing we got there early.

All in all, it was quite a fun time! 

Monday, December 2, 2013

Great Recipes for the Holidays

Below are some great recipes that members of the Friends of HHU Team use for holiday entertaining, gift giving and/or enjoying themselves. Hope that you find them yummy and add them to your recipe file.


The first comes from Kathy of  www.kcowie.etsy.com

She found this on www.eatcakefordinner.net and says it is wonderful and easy.

Crockpot Hot Fudge Cake


1 c. all-purpose flour
1 3/4 c. light brown sugar, packed and divided
1/4 c. plus 3 Tbl. baking cocoa, divided
2 tsp. baking powder
1/4 tsp. salt
1/2 c. milk
2 Tbl. butter, melted
1 tsp. vanilla extract
1 3/4 c. hot water
vanilla ice cream

Combine flour, one cup brown sugar, 3 Tablespoons cocoa, baking powder and salt in a medium bowl.  Whisk in milk, butter and vanilla.  Spread evenly in a 3 1/2-quart crockpot.  Mix together remaining 3/4 cup brown sugar and 1/4 cup cocoa; sprinkle evenly over top of batter.  Pour in hot water; DO NOT STIR.  Cover and cook on high setting for 2 hours, or until a toothpick inserted one-inch deep comes out clean.  Spoon warm cake into bowls; top with vanilla ice cream.  Serves 4-6. 

Evidently the secret to this cake is NOT TO STIR


The next one comes from Robin of www.RobinsFlight.etsy.com

Mock Thin Mints

Ingredients:
Ritz Crackers
Semi sweet chocolate
Peppermint extract
Crushed candy canes (opt)

Melt chocolate in microwave or double boiler. Stir in a few drops of peppermint extract to desired minty-ness. Dip crackers into chocolate so both sides are covered, lay on waxed paper. Sprinkle with crushed candy canes, if desired. Allow to cool/dry completely. Store in a tightly sealed container, if they last more than a day.


This wonderful appetizer comes from Nancy
www.NancyEllenStudio.etsy.com

ARTICHOKE SPINACH SPREAD
1 package frozen chopped spinach
1 pk. 8 oz. Cream cheese
1/4 cup Parmesan cheese
1/4 c mayo
1 teaspoon lemon juice
1/4 tsp. Garlic powder
14 oz. Artichoke hearts, drained and chopped
7 oz. Roasted red peppers

In large bowl mix all ingredients, spoon into microwave dish and heat in microwave for 3 minutes.
Serve with crackers or pretzels.


Another appetizer from Alyce of www.FabricGreetings.etsy.com

Soft Tortilla Pinwheels

1 package of soft tortillas- can be small or large
8oz block of cream cheese - softened
ONE of the following:
chopped black or green olives
chopped hot peppers
jar of red pepper relish
or
tub of cream cheese spread - salmon or garden veggie
tub of pimento cheese

Mix plain cream cheese with accompaniment of your choice. Spread a layer on each tortilla leaving 1/2" uncovered on one edge. Starting with the uncovered edge, roll into a log. Wrap tightly in clear wrap and refrigerate overnight. Slice into 3/4" slices and serve. Make as many or as few as you need. Can substitute other fillings such as hummus or pesto.


This next recipe comes to us from Wales by way of Morocco. It is offered by Sewsouk.
She runs www.Sewsouk.etsy.com


Bara Brith

This is a Welsh teabread. It literally means speckled bread in Welsh.
When I think of British winter cakes I always think of fruit cakes or tea breads and this is a good mix of both. It can be served warm, sliced and spread with butter but also as a cake. It is wonderfully moist and easy to make .
Sometimes it is made with yeast but this version is simpler.

You will need one 2lb loaf tin
Preheat oven at 170 degrees C, 350F or Mark 4

Ingredients

12 oz (or 300g) mixed dried fruit eg sultanas (dried white grapes), raisons , currents- whatever you have to hand

10floz (300ml) strong hot black tea (no milk)

8 oz (or 225g) soft brown sugar

grated rind of 1 lemon

10 oz (or 275g) self raising plain or wholemeal flour- if you don’t have flour with the baking agent mixed in add a teaspoon of baking powder to plain flour.

1 teaspoon mixed spice
or 1/3 tsp ginger
1 /3 tsp cinnamon
1/.3 tsp of allspice

1 large egg beaten


Soak the dried fruit and sugar over night or for a few hours in the black tea. This is the secret to a wonderfully moist tea bread.

The fruit should soak up a lot of the liquid and be plump .
Add the flour, spice and lemon zest.and egg to the mixture - it should be a consistency that slowly drops from the spoon.

Line the bottom of a 2lb loaf tin with grease proof paper and grease. Place the mixture in the tin and level.

Bake for about 1 1/2 hours in a preheated oven- check with a skewer that t tea bread it is done- the skewer should come out clean . The tea bread should have risen and be a lovely golden brown . Cool in the tin for about 10 minutes and turn out and cool on a wire rack. It is easy to slice when cold. Serve sliced and spread with butter or sliced as a cake


And if you are in need of an easy meal, this comes from Kathy ofwww.KCowie.etsy.com


Honey Garlic Chicken Recipe

2-4 chicken breast
3 cloves crushed garlic
1/2 cup soy sauce
1/2 cup ketchup
1/3 cup honey

Place into crock pot and cook on high for 3-4 hours. I had rice and vegetables with ours.


Monday, November 18, 2013

Science for Kindergarteners (and the rest of us): Magnets

by RobinsFlight

Last month I posted about a set of science experiments on color that I did in my son's kindergarten class.  This month I returned with another set of experiments to try, this time working with magnetism.

The classroom already has a few activities that involve magnets.  My favorite is this floating magnetic ring set.  It has disk magnets that can fit on a stand which also has a disc magnet in its base and a point sticking up from the base that will fit through the holes of the magnets- like a magnetic ring toss.  Because the poles of the magnets are on the flat sides, they either attract or repel based on which sides you put together.  By stacking the magnets so they are repelling each other they float.  And giving a gentle push to the top one, you can make the magnets jump quite far into the air.

Because they had already talked about magnets in class some, I decided to try some experiments that took their understanding a bit further.  We magnetized needles to create our own compasses and made electromagnets!

First we reviewed a bit.  Magnets always have two poles, a north and a south, or put another way, a positive and a negative.  They are magnetic because the free electrons within the atoms they are made of are all spinning in the same direction.  This creates a magnetic field that attracts other substances that have free electrons that are easily adjusted based on that field, such as metals like iron.
Magnetizing a needle

Here comes the fun part:  You can make a magnet out of something that is attracted to a magnet, like a metal needle or a nail.  We used embroidery needles.  Hold the needle firmly at one end (for some of the kids it was easier to hold the needle against the table).  Then take a magnet and stroke it down the needle, using only down strokes (pick it up and the end and start back at the top).  Do not turn the magnet while you are doing this, but keep the poles aligned the same way with each stroke.  Depending on the metal you are using and the strength of the magnet, this could take 50 strokes or 150.  How does this work?  The magnet being rubbed on one direction down the metal needle gradually pulls the electrons in the needle to have the same spin.  The more times you rub the magnet along the needle and the stronger the magnet, the greater the amount of the metal atoms in the needle have the same spin, and the greater the strength of the magnetic field around the needle.

Test your new magnet with another piece of metal to see how strong it is.  If you want to use it for a compass, it only needs a slight pull towards the metal.
Our magnetic needle compass

The earth also has a weak magnetic field and magnetic north and south poles.  The magnetic bar in a compass is attracted to the opposite poles of the earth, allowing it to find due north.  To make a compass out of your new magnet needle, fill a bowl with water.  Float a lightweight object like a bottle cap or a cork (in the pictures I used a milk jug lid) on top of the water.  Carefully place your magnetic needle on top so it can spin.  One end of the needle should point north and the other south.  In the picture, you can see that I labelled a paper with the compass points for our demonstration. 

So making a compass is pretty cool.  And we learned about electrons moving in the same direction.  Well, what else has electrons moving the the same direction?  You guessed it...electricity!  The current running through a wire wrapped around a nail will actually align the spins in those metal atoms in the same way that the magnet did with our needle, but this only happens while the current is flowing.  Once the current stops, the magnetic field in our nail is gone again.

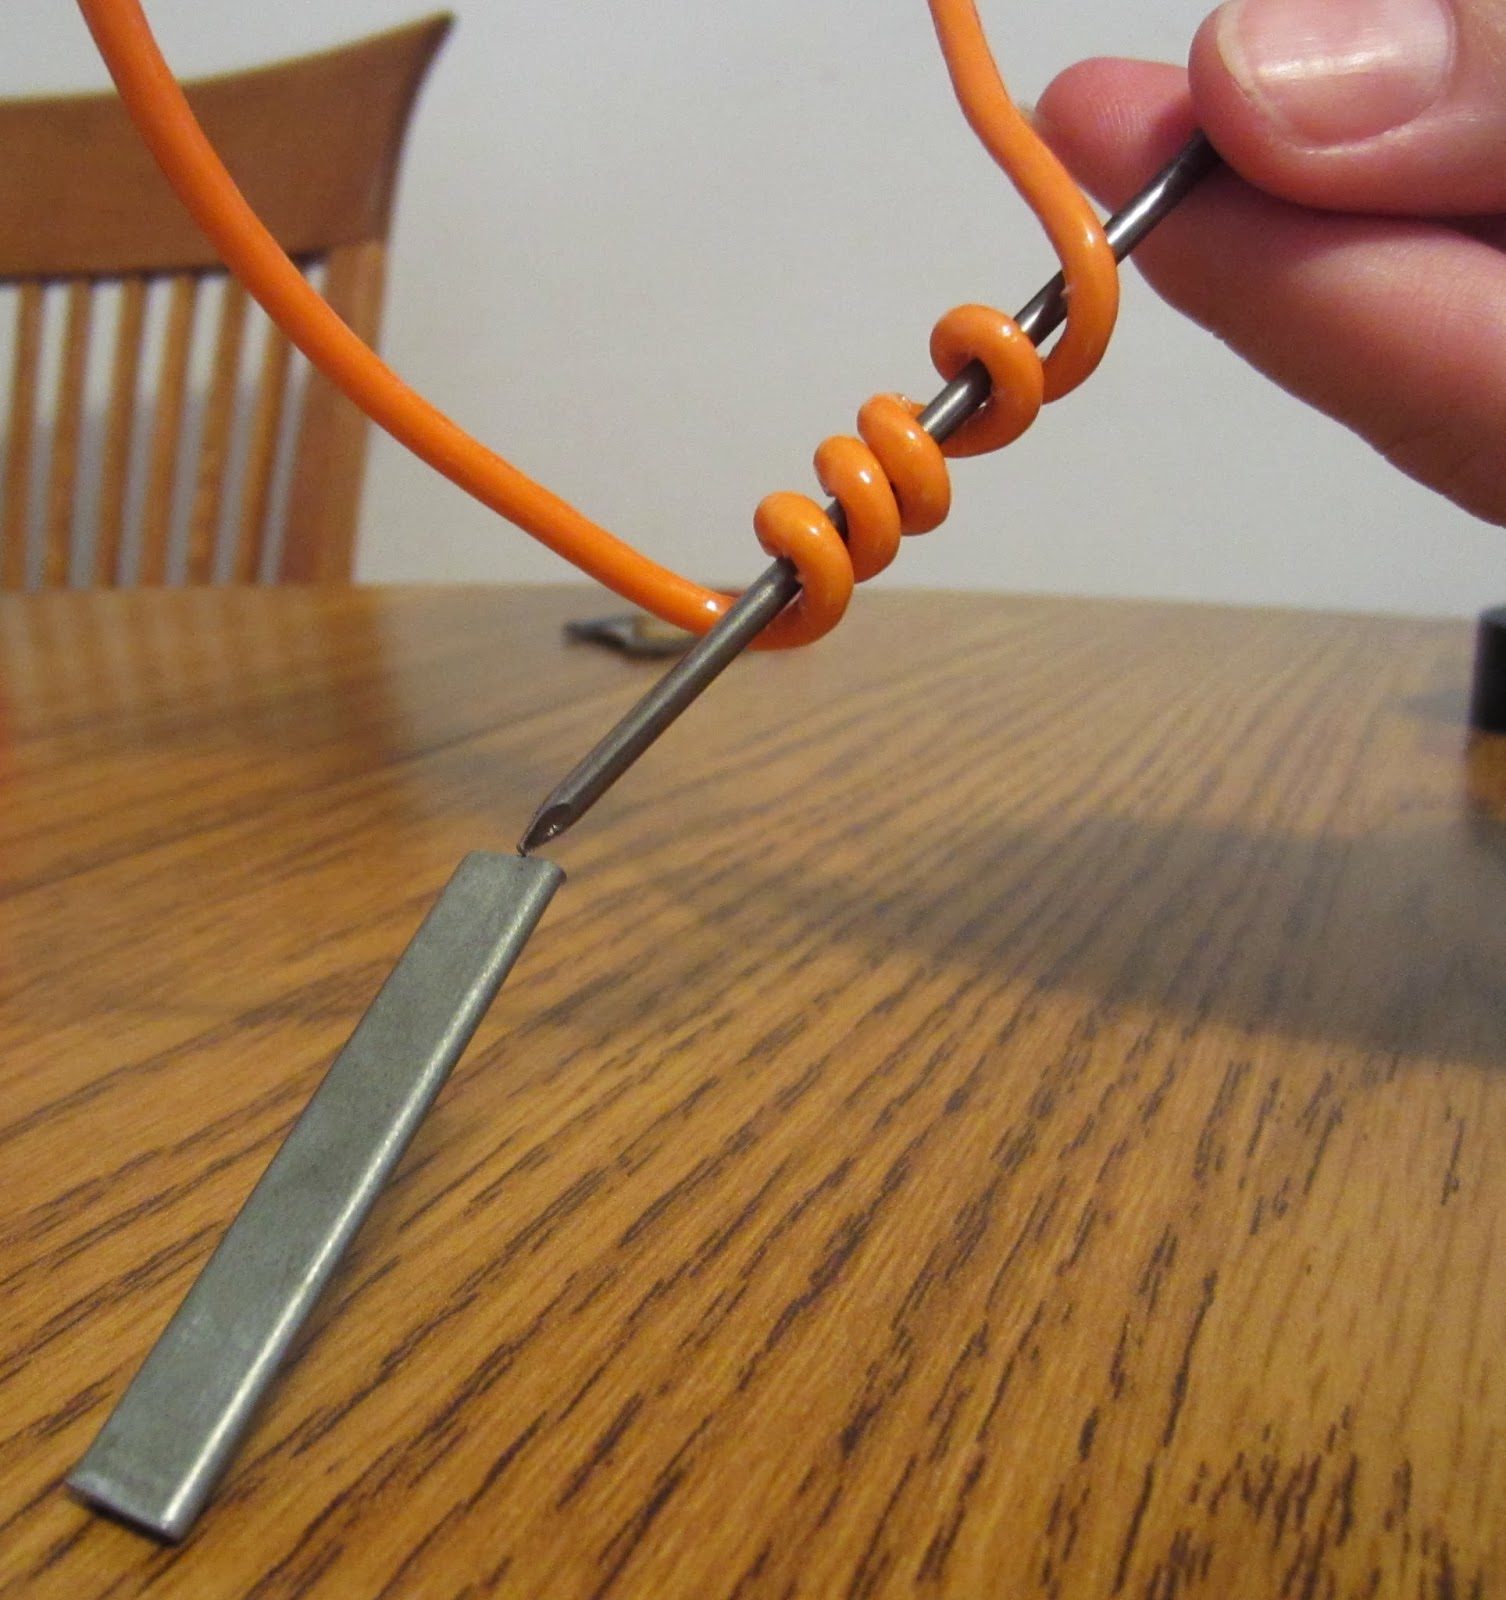
To make an electromagnet, you will need a D cell battery, a piece or two of coated copper wire about 9-12" long with the ends stripped, an iron nail about 3" long, and electrical tape.  First, coil the wire around the nail a few times.  Depending on the gauge of your wire, this could be a big difficult.  The wire we used was a bit on the thick side, I think.  It doesn't matter whether the wire is coiled clockwise or counterclockwise, but the coils can't overlap each other.  The more coils you make, the stronger your magnet will be.  In our experiments we used a wire with 5 coils and a wire with 10 coils and tested each one.


Next, use electrical tape to attach the stripped ends of the wires to the battery.  I found that the wires still tended to slip out from under the tape unless I held them.  Be careful, the ends of the battery can get hot, so you won't want to hold them for too long!  A pair of wooden tongs would have been a useful tool for this experiment.


In our experiment, the wire coiled 5 times magnetized the nail enough to lift up the end of this small piece of metal, but not enough to pick it up off of the table.   (See picture to the left.)


But when we used the wire coiled 10 times, the magnetized nail was strong enough to lift the piece of metal off the table and hold it suspended in the air.  How cool is that!?  (See picture to the right.)  It also got hot a lot faster.  We also tried connecting two batteries in sequence to the 5 coil wire.  It seemed somewhat stronger than with only one battery, but not as strong as the wire with more coils.

The kids had a lot of fun with this one, and I did too.  I'm not sure what the next science day will hold, but I'm sure it'll be interesting.  And now, where did they put that floating magnetic ring set?  I want to make some magnets fly!