by RobinsFlight
In my last post, I talked about my endeavors with thread crochet and wedding presents. But like I said then, thread crochet is not something I do a lot of. I like projects with a little more instant gratification- something that doesn't involve quite as much time and work for so small an end product.
But not only do I like instant gratification, I also seem to have a
short attention span in my hobbies. I have one granny square afghan
that took years for me to finish. I'd work on a few squares, then get
bored with doing the same thing repeatedly and set it aside for a few
months, then come back to it until I got bored again. I also have a
problem I think I share with many crafters: I see something someone else
has made, and think, "I could do that!" And soon I'm browsing the
aisles of local craft stores to see what supplies I don't yet have for
my newest hobby. And often it only takes a few attempts to realize
that while yes, I could do that, it isn't as easy as it looks!
And
so while browsing Etsy I would happen on beaded bracelets that said
they were crocheted. And you know what went through my head. A
few trips to craft stores for beads and few YouTube videos later, I was
ready to start! It's crochet, after all, and I know I can do that! As usual, I found out that I may need a bit more
practice before my attempts rival anything I'd seen for sale by these
talented people.
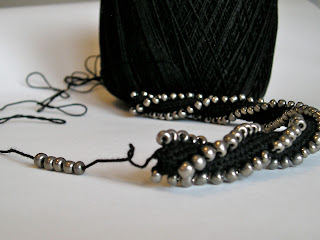
To
incorporate beads into crochet, you have to string the beads onto the
thread before starting to crochet. This means knowing not
only how many beads you'll need, but also what order they need to be in
if you're using more than one color or type of bead so that they create the desired pattern. It also means
having a needle whose eye is thin enough to go through the holes in the
beads and still thick enough to get your thread through! Once the beads
are threaded, you pull each bead up in turn and essentially crochet
around the bead to include it at the stitch you'd like.
My
first attempt at a fully beaded bracelet was a complete failure. The
beads would tend to crowd each other and not lay flat, but when I added
stitches between them they were too far apart. It didn't take long
before I realized that maybe I should start with something simpler. So I
went for a simple zigzag pattern with beads interspersed at the bends.
And I came out with something fairly nice- a decent first attempt. But
I still wanted to try something with more beads. In this case, my
knowledge of crochet and experience creating my own patterns was definitely helpful. I designed a pattern that had 3 columns of beads that would, due to the tendency of crochet, spiral around each other. I also decided to stick with one type and color of bead, to simplify things. It was sometimes difficult working in such a small circle, but once I got the rhythm it wasn't too hard.
Connecting the ends was significantly more difficult. It took a few
attempts to actually connect them so that it wasn't obvious where to
connection had been made. But the finished bracelet soon became one of
my favorite pieces. It was soft and flexible, but had the bit of
sparkle from the beads. All in all, I was pleased.
I still haven't attempted the fully beaded bracelet, where none of the thread is visible.
Maybe one of these days I'll tire of my current latest endeavor and
have another attempt. Or maybe just I'll leave that to the experts.
After all, I'm realizing that sometimes you maybe could
make something, but it might be worth spending the money on that
gorgeous one that caught your eye because someone else has the expertise
to make it and make it well, and supporting another
crafter-entrepreneur at the same time!
Monday, May 27, 2013
Monday, May 13, 2013
Snail Mail is Not Dead
by FabricGreetings
I am a great fan of snail mail. My business is built around that concept. I love all the new and interesting stamps that are released and my postmistress knows when I come in, I am not buying the regular Flag or Liberty Bell stamps. I want to see what is new – but more on that later.
Early this year MooreMagnets suggested I might find the blog www.MissiveMavin.com interesting. And I do. She is also a seller on etsy and promotes snail mail. In the course of reading her blog, I discovered http://www.postcrossing.com/.
Postcrossing is a site for people who like to send and receive postcards. It works quite easily – even I was able to figure it out. You register on the site and ask for an address. You are given an address, a short bio of the receiver and a ID number to write on your card.
Once your card has been sent and received, it gets registered and your name will be put on the receiver list. I have received about 14 cards from all over the world.
Some are scenic cards.
Some are art cards.
All are interesting.
Perhaps more interesting than the cards are the many stamps that accompany the cards. The USPS has a global international stamp that is round. It cost $1.10 to send an international card. I use both the global stamp or one forever stamp (46 cents) and two postcard stamps from last year (32 cents each). It gives the recipient a variety of stamps at one time.
But the stamps from around the world are amazing.
Can you imagine a stamp with guitar strumming pigs? Got one from the Czech Republic.
The card from Finland has sledders on it – why is that not a surprise?
Some stamps are just scenic.
But all the stamps have one thing in common. They are unique.
For those of you who are just flag and bell stamp users, here are a few of the new stamps I found at the post office this week.
So if you are looking for an interesting hobby, check out Postcrossing. Or if you don't want to join an organized group, take it upon yourself to send someone a card. You might be lucky enough to get one in return.
Labels:
FabricGreetings,
letters,
postage stamps,
postcards,
snail mail
Monday, May 6, 2013
Banana Chocolate Chip Oatmeal Cookies
I'm always on the lookout for good recipes to use up those old bananas, because no matter how many I buy I always seem to end up with a couple that start to get brown. One of my favorites is banana cocoa bars, which I posted here. This new recipe is one I've adapted, which I love because I can make these cookies with whatever I happen to have on hand. At the end I'll give some great suggestions for alternative add ins to give a completely different, but equally yummy, cookie.
Banana Chocolate Chip Oatmeal Cookies
6 tbsp. butter or margarine, softened
1 cup brown sugar
1/2 cup granulated sugar
1 egg
1 tsp. vanilla extract
3/4 cup all purpose or whole wheat flour
1 tsp. baking soda
1 tsp. cinnamon
3 1/2 cups rolled or quick cook oats
1 cup ripe bananas, mashed (about 2)
1 cup chocolate chips
Preheat oven to 350* F. Grease cookie sheets or spray with no-stick cooking spray. In medium bowl, cream butter and sugars. Stir in egg and vanilla. In another bowl, combine flour, soda and cinnamon. Stir into wet mixture just until combined. Stir in oats, bananas and chocolate chips. Drop by heaping tablespoons onto cookie sheets. Bake 10-12 minutes. Allow to cool for a minute before removing cookies from sheets.
Perfect for an afternoon or bedtime snack!
Alternatives:
Substitute one 8-oz. can crushed pineapple for bananas and shredded coconut for chocolate chips.
Substitute applesauce for bananas and dried cranberries or cherries for chocolate chips.
Substitute raisins and chopped walnuts for chocolate chips.
Or try your own combo and let me know what your favorite is!
From RobinsFlight's kitchen to yours, enjoy!
Subscribe to:
Posts (Atom)